> ## Documentation Index
> Fetch the complete documentation index at: https://api.globalwebindex.com/docs/llms.txt
> Use this file to discover all available pages before exploring further.
# Copilot Studio
## Overview
The GWI MCP server integrates with Microsoft Copilot Studio using the MCP onboarding wizard. This enables agents to access GWI consumer insights data through OAuth 2.0 authentication.
Reference: [Copilot Studio MCP official documentation](https://learn.microsoft.com/en-us/microsoft-copilot-studio/mcp-create-new-server)
## Setting Up GWI MCP Tool in Agent Builder
1. Open your agent, navigate to the **Tools** page, and select **New tool** 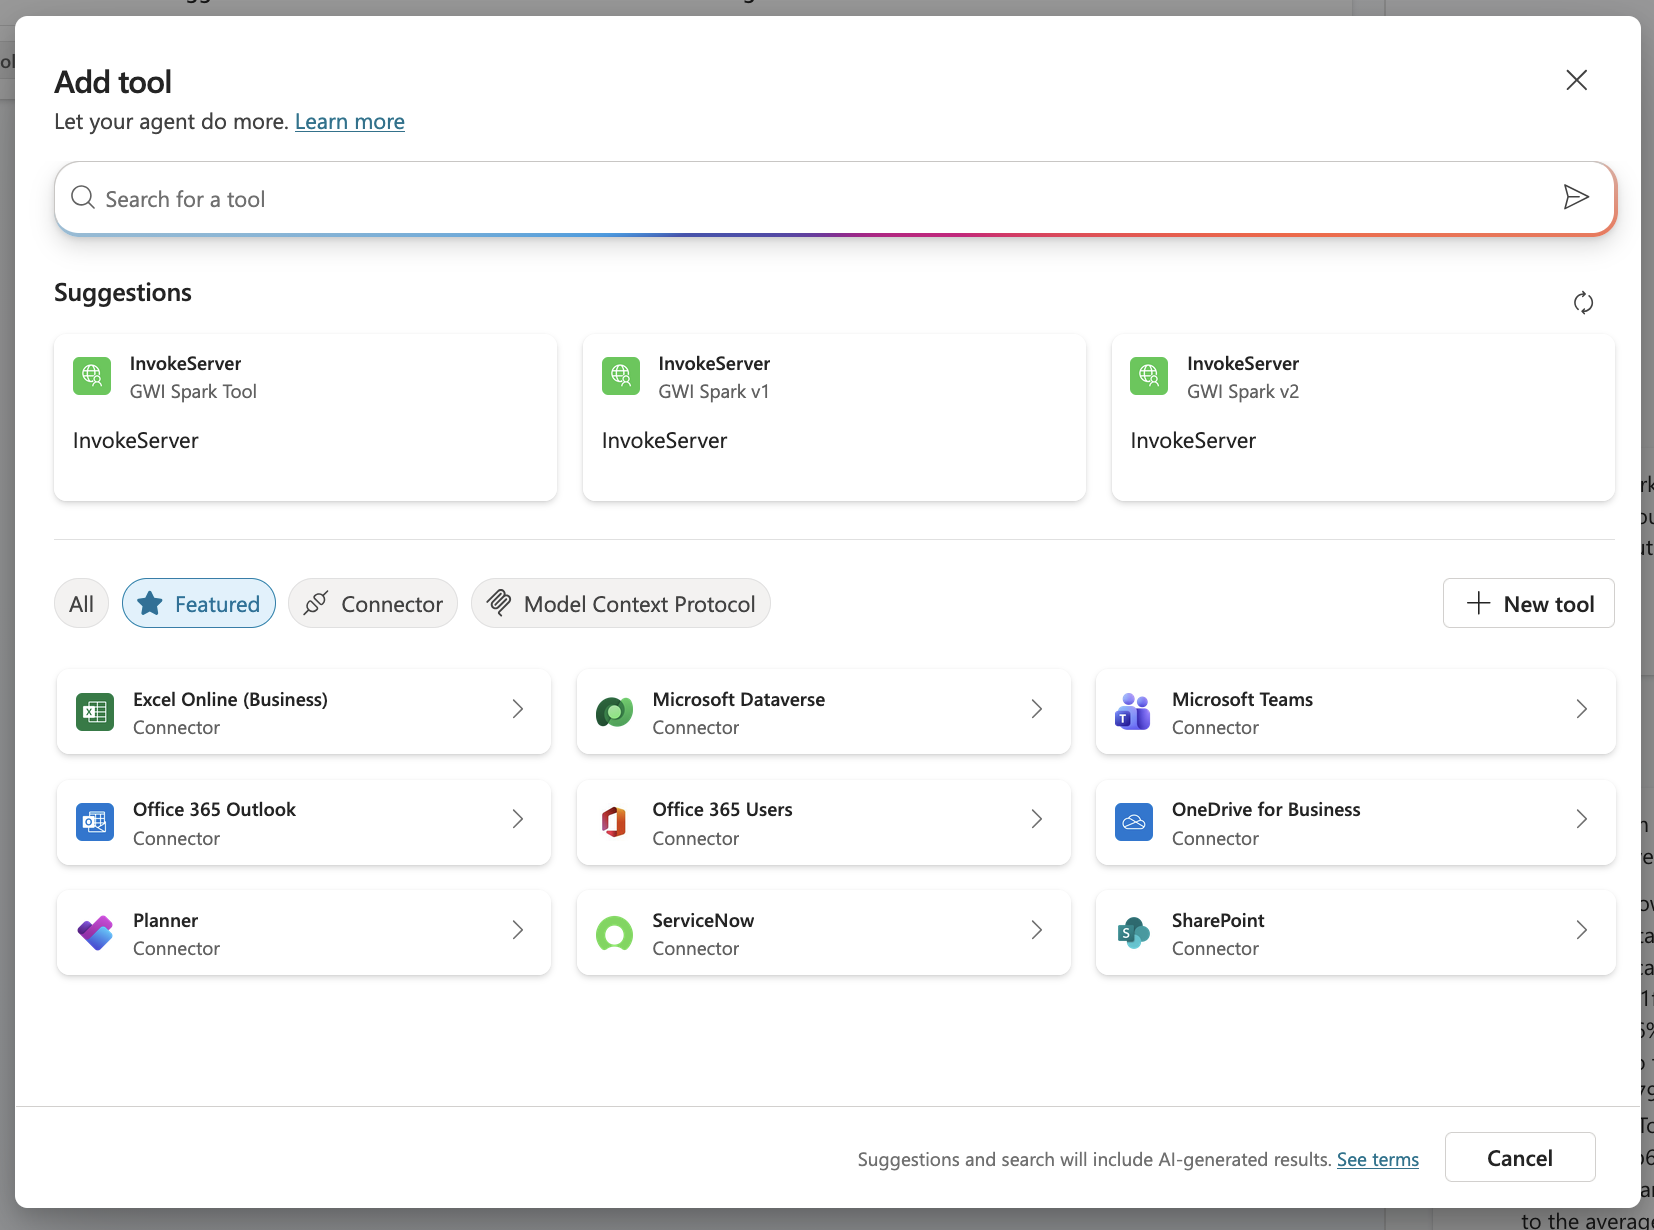 2. Select **Model Context Protocol**:
 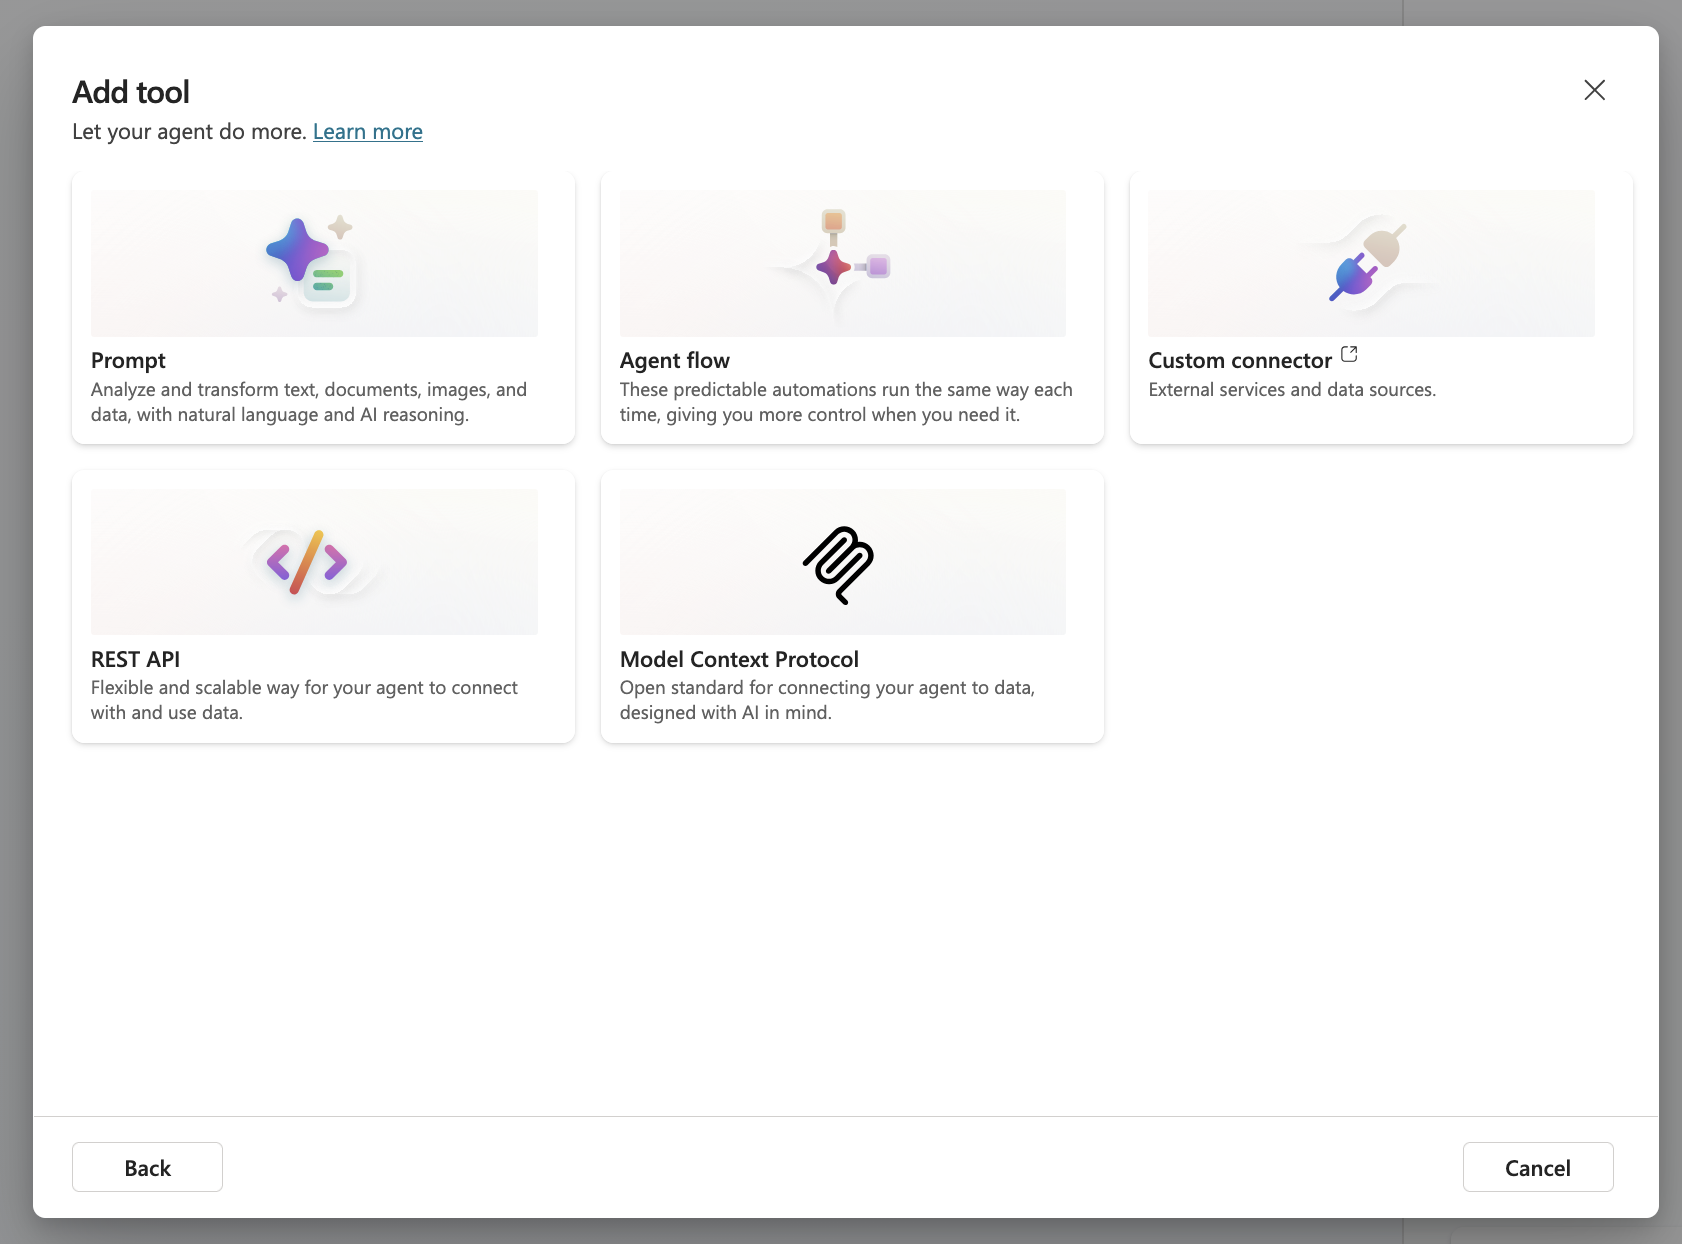 3. Configure the MCP server details, ensuring the URL is correct
 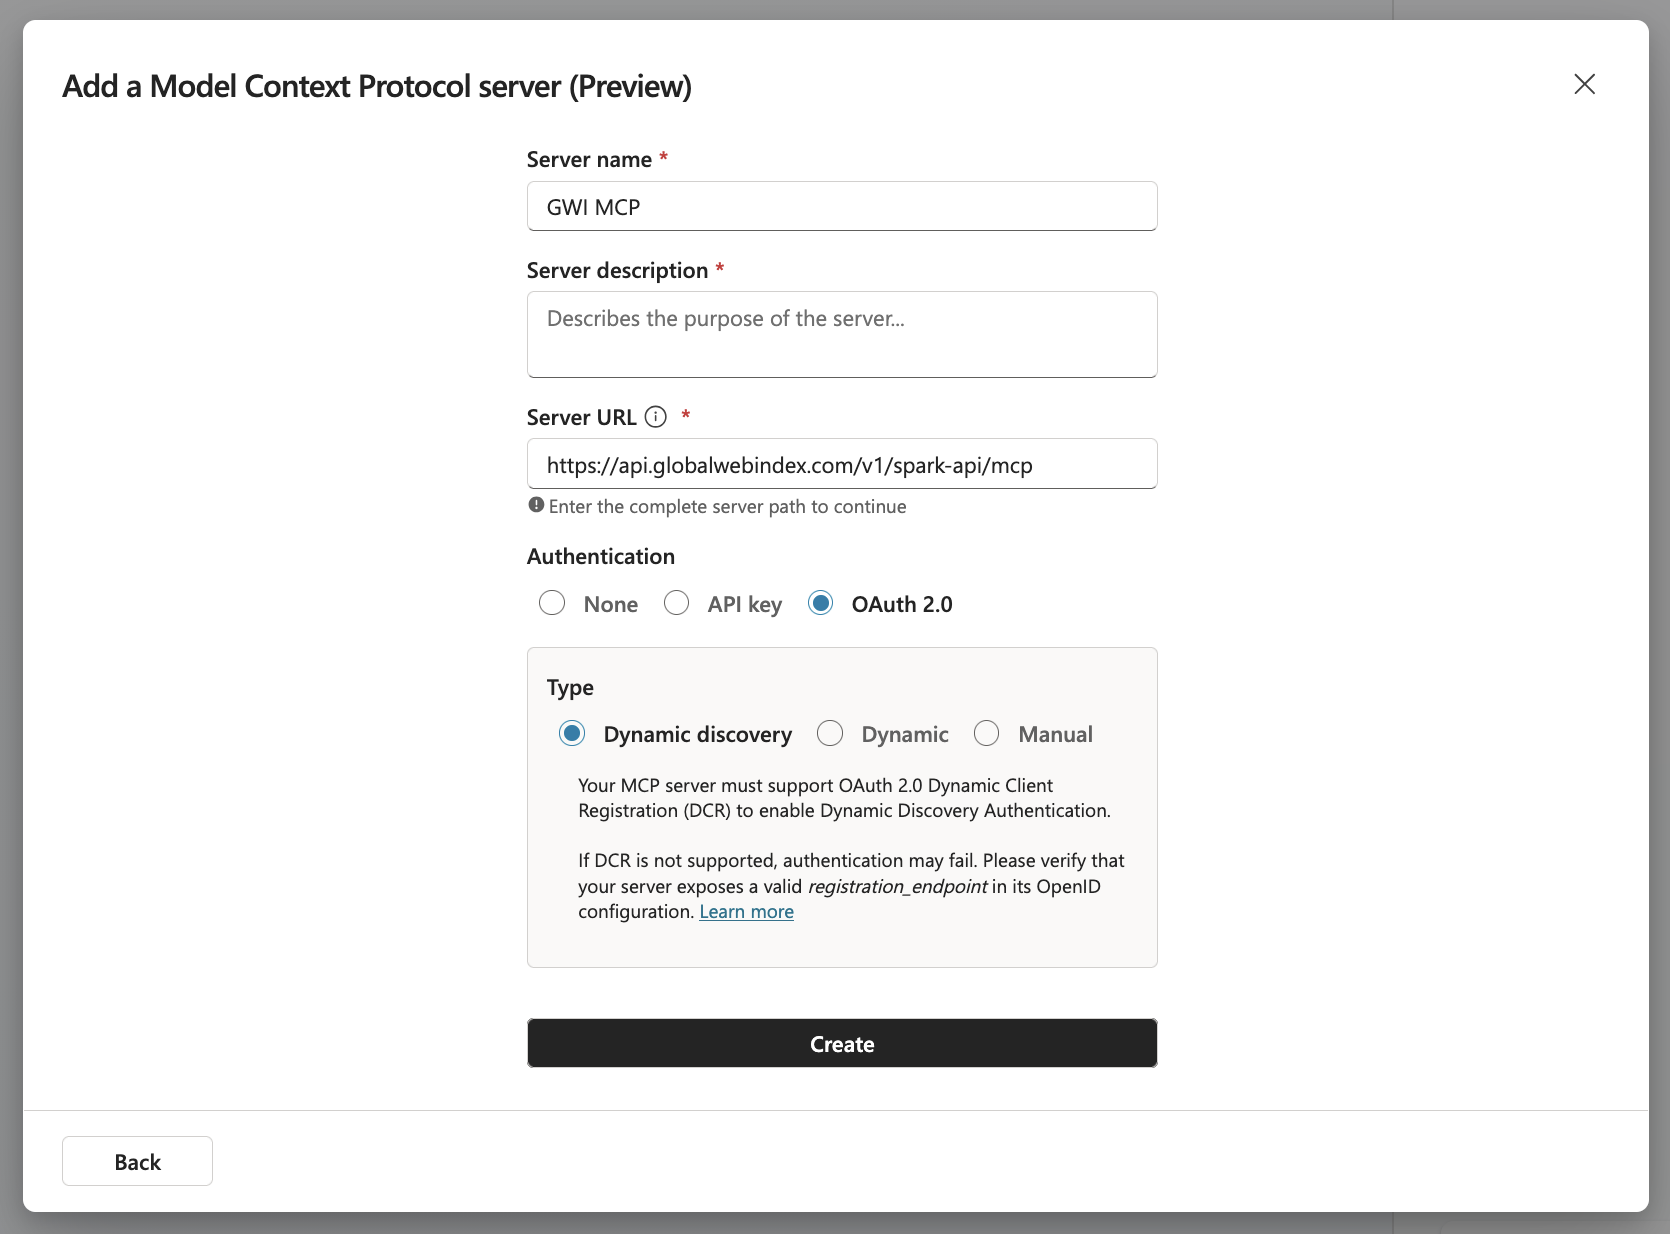 * **Server Description**: Uncover instant insights from real humans across 50+ global markets
* **Server URL**: `https://api.globalwebindex.com/v2beta/spark-api/mcp`
4. Select **OAuth 2.0** as the authentication type and **Dynamic discovery** as the OAuth 2.0 type
5. Create a connection. You will be redirected to the GWI sign-in page. Use your GWI credentials to sign in.
* **Server Description**: Uncover instant insights from real humans across 50+ global markets
* **Server URL**: `https://api.globalwebindex.com/v2beta/spark-api/mcp`
4. Select **OAuth 2.0** as the authentication type and **Dynamic discovery** as the OAuth 2.0 type
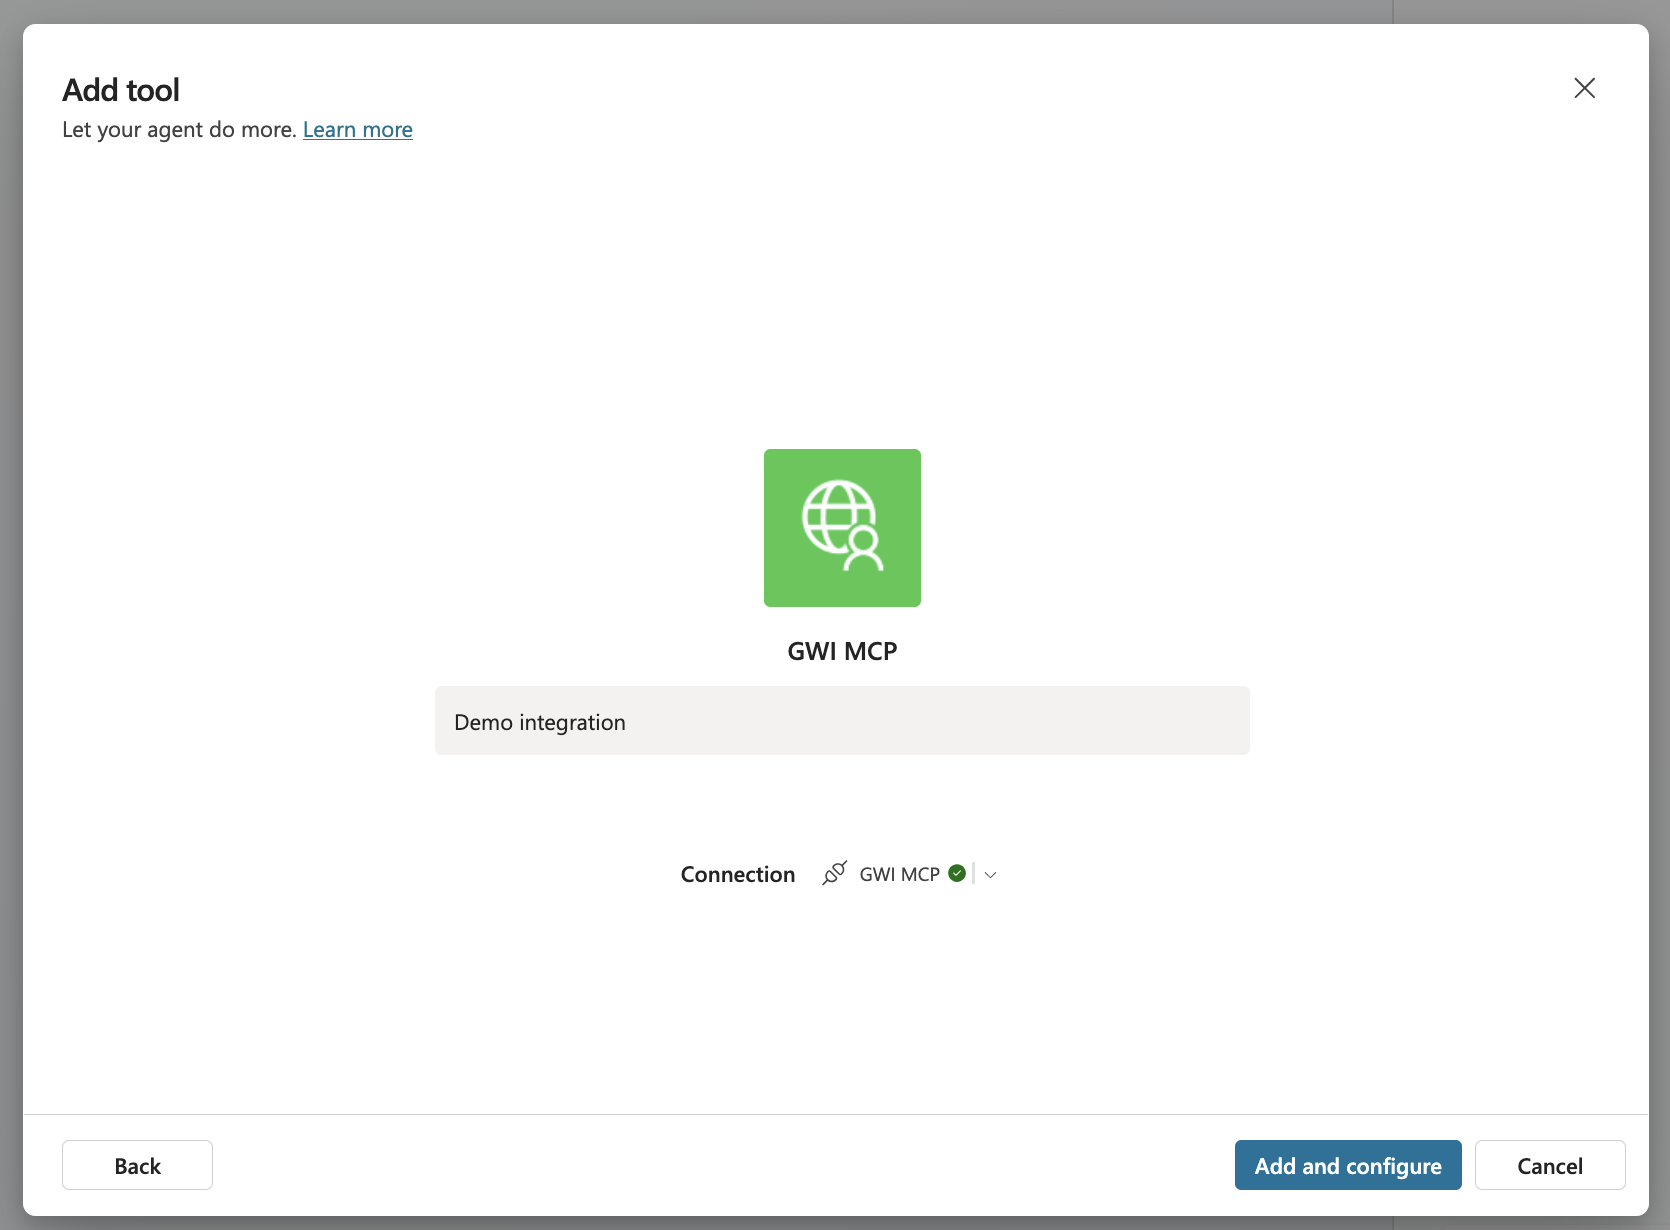
5. Create a connection. You will be redirected to the GWI sign-in page. Use your GWI credentials to sign in. 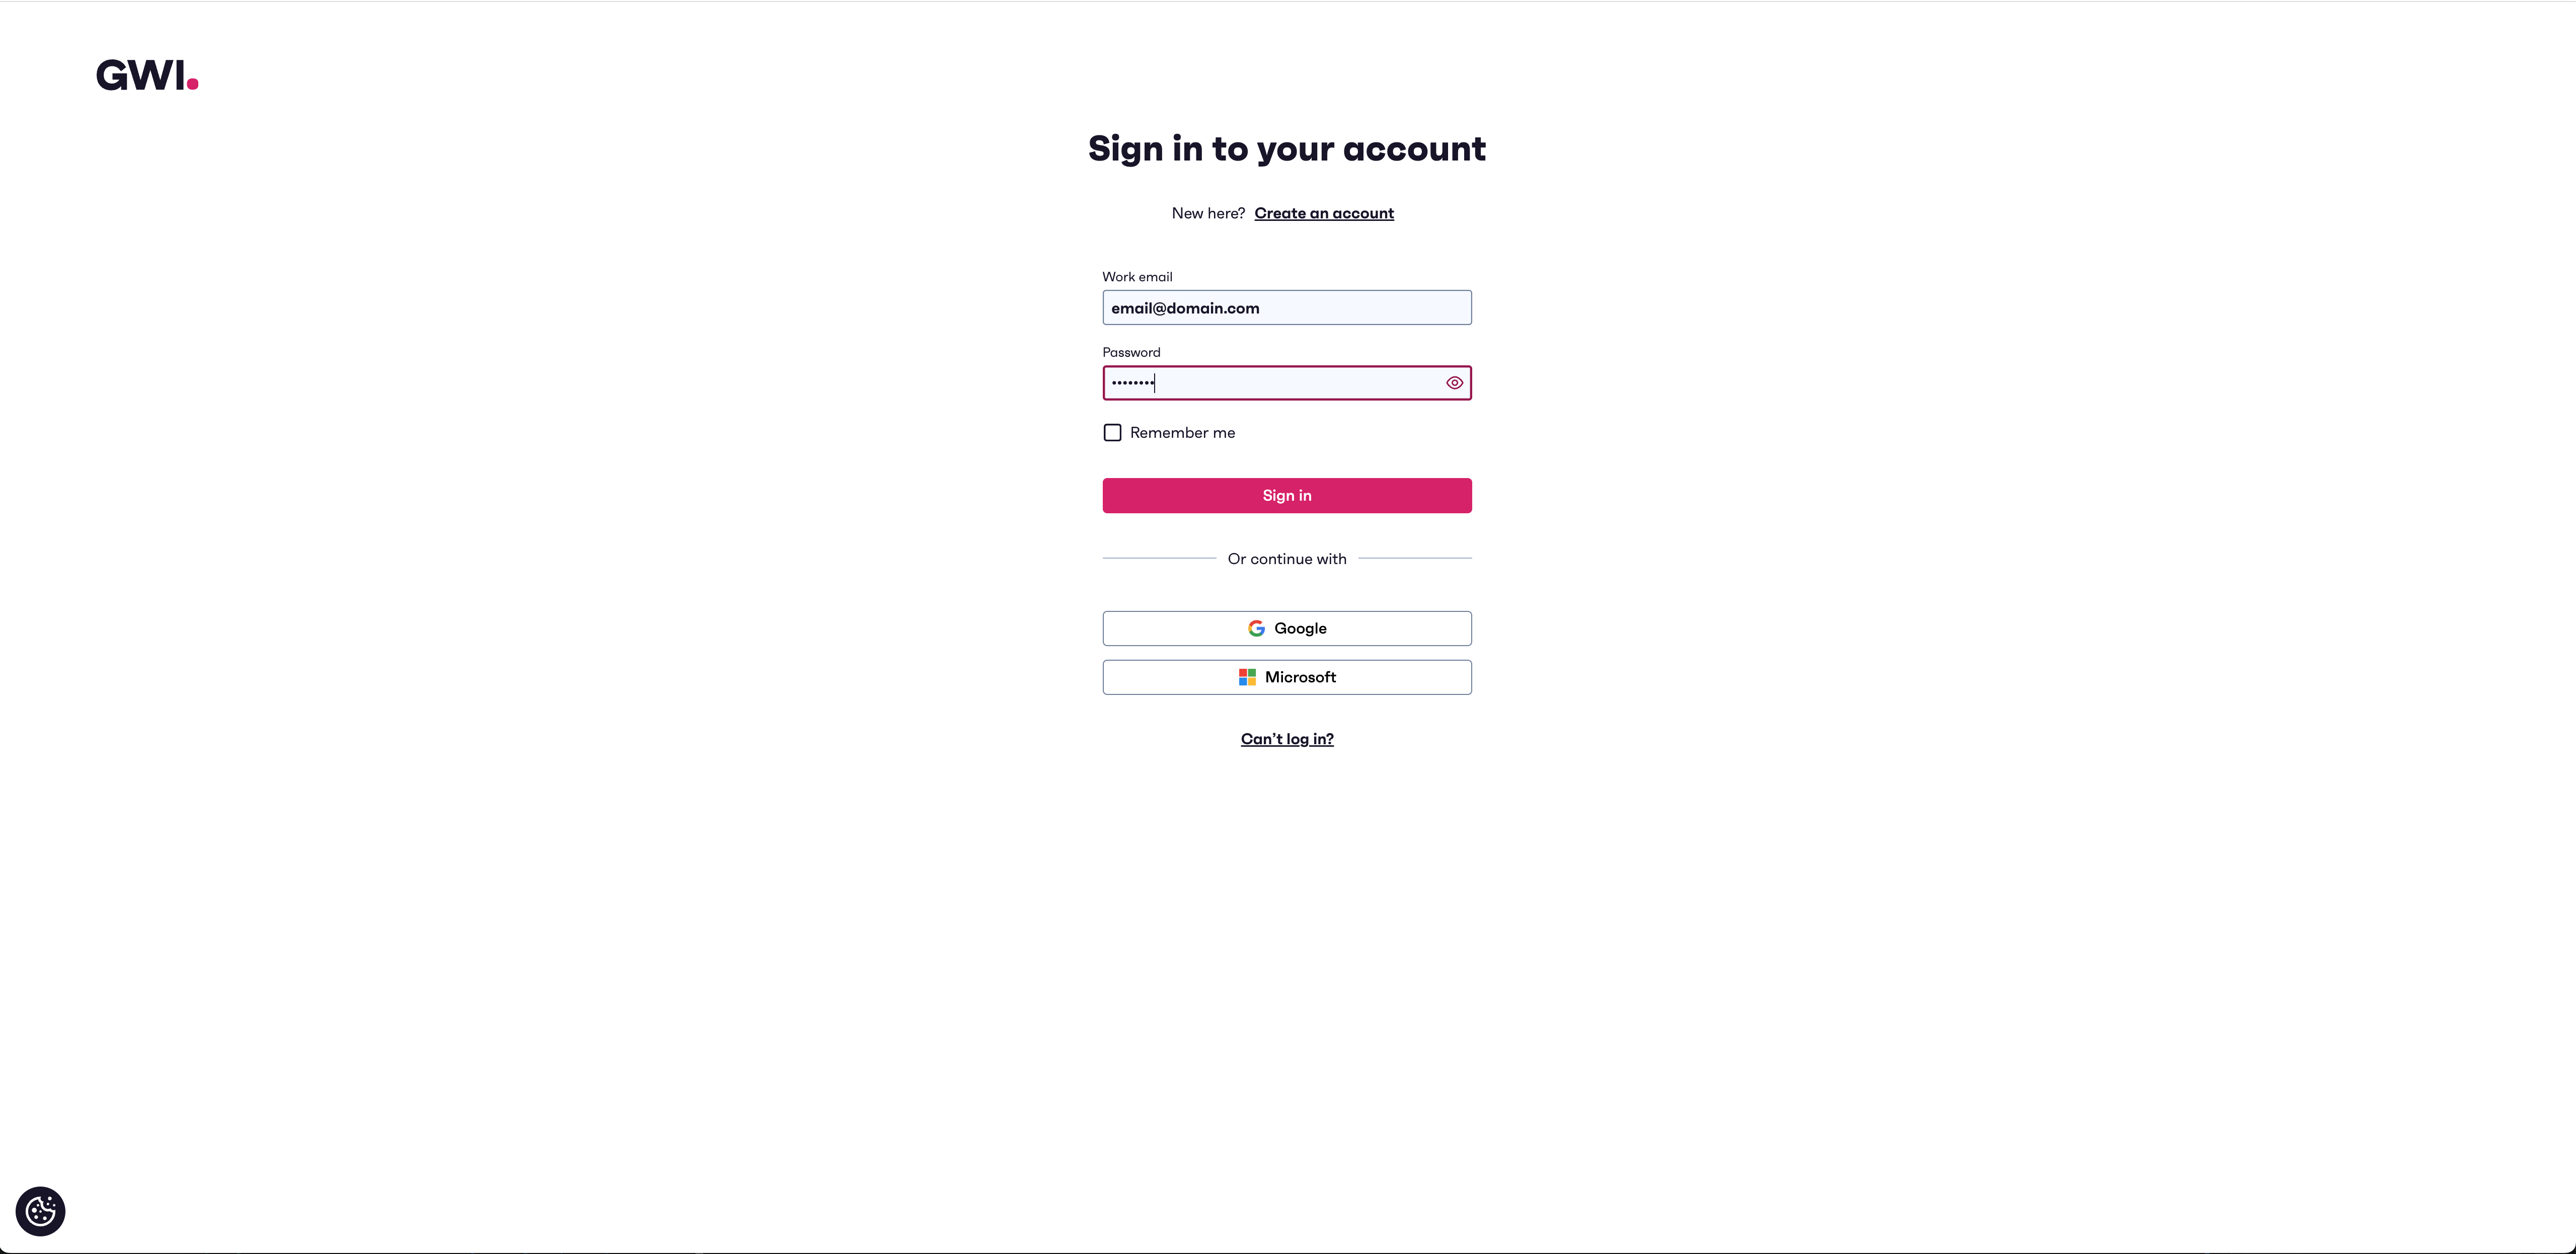 Review the requested permissions and scopes, then click **Allow** to authorize the connection. Copilot Studio handles token refresh automatically. Once the connection is created, you will be prompted to add the MCP tool and configure it in the agent.
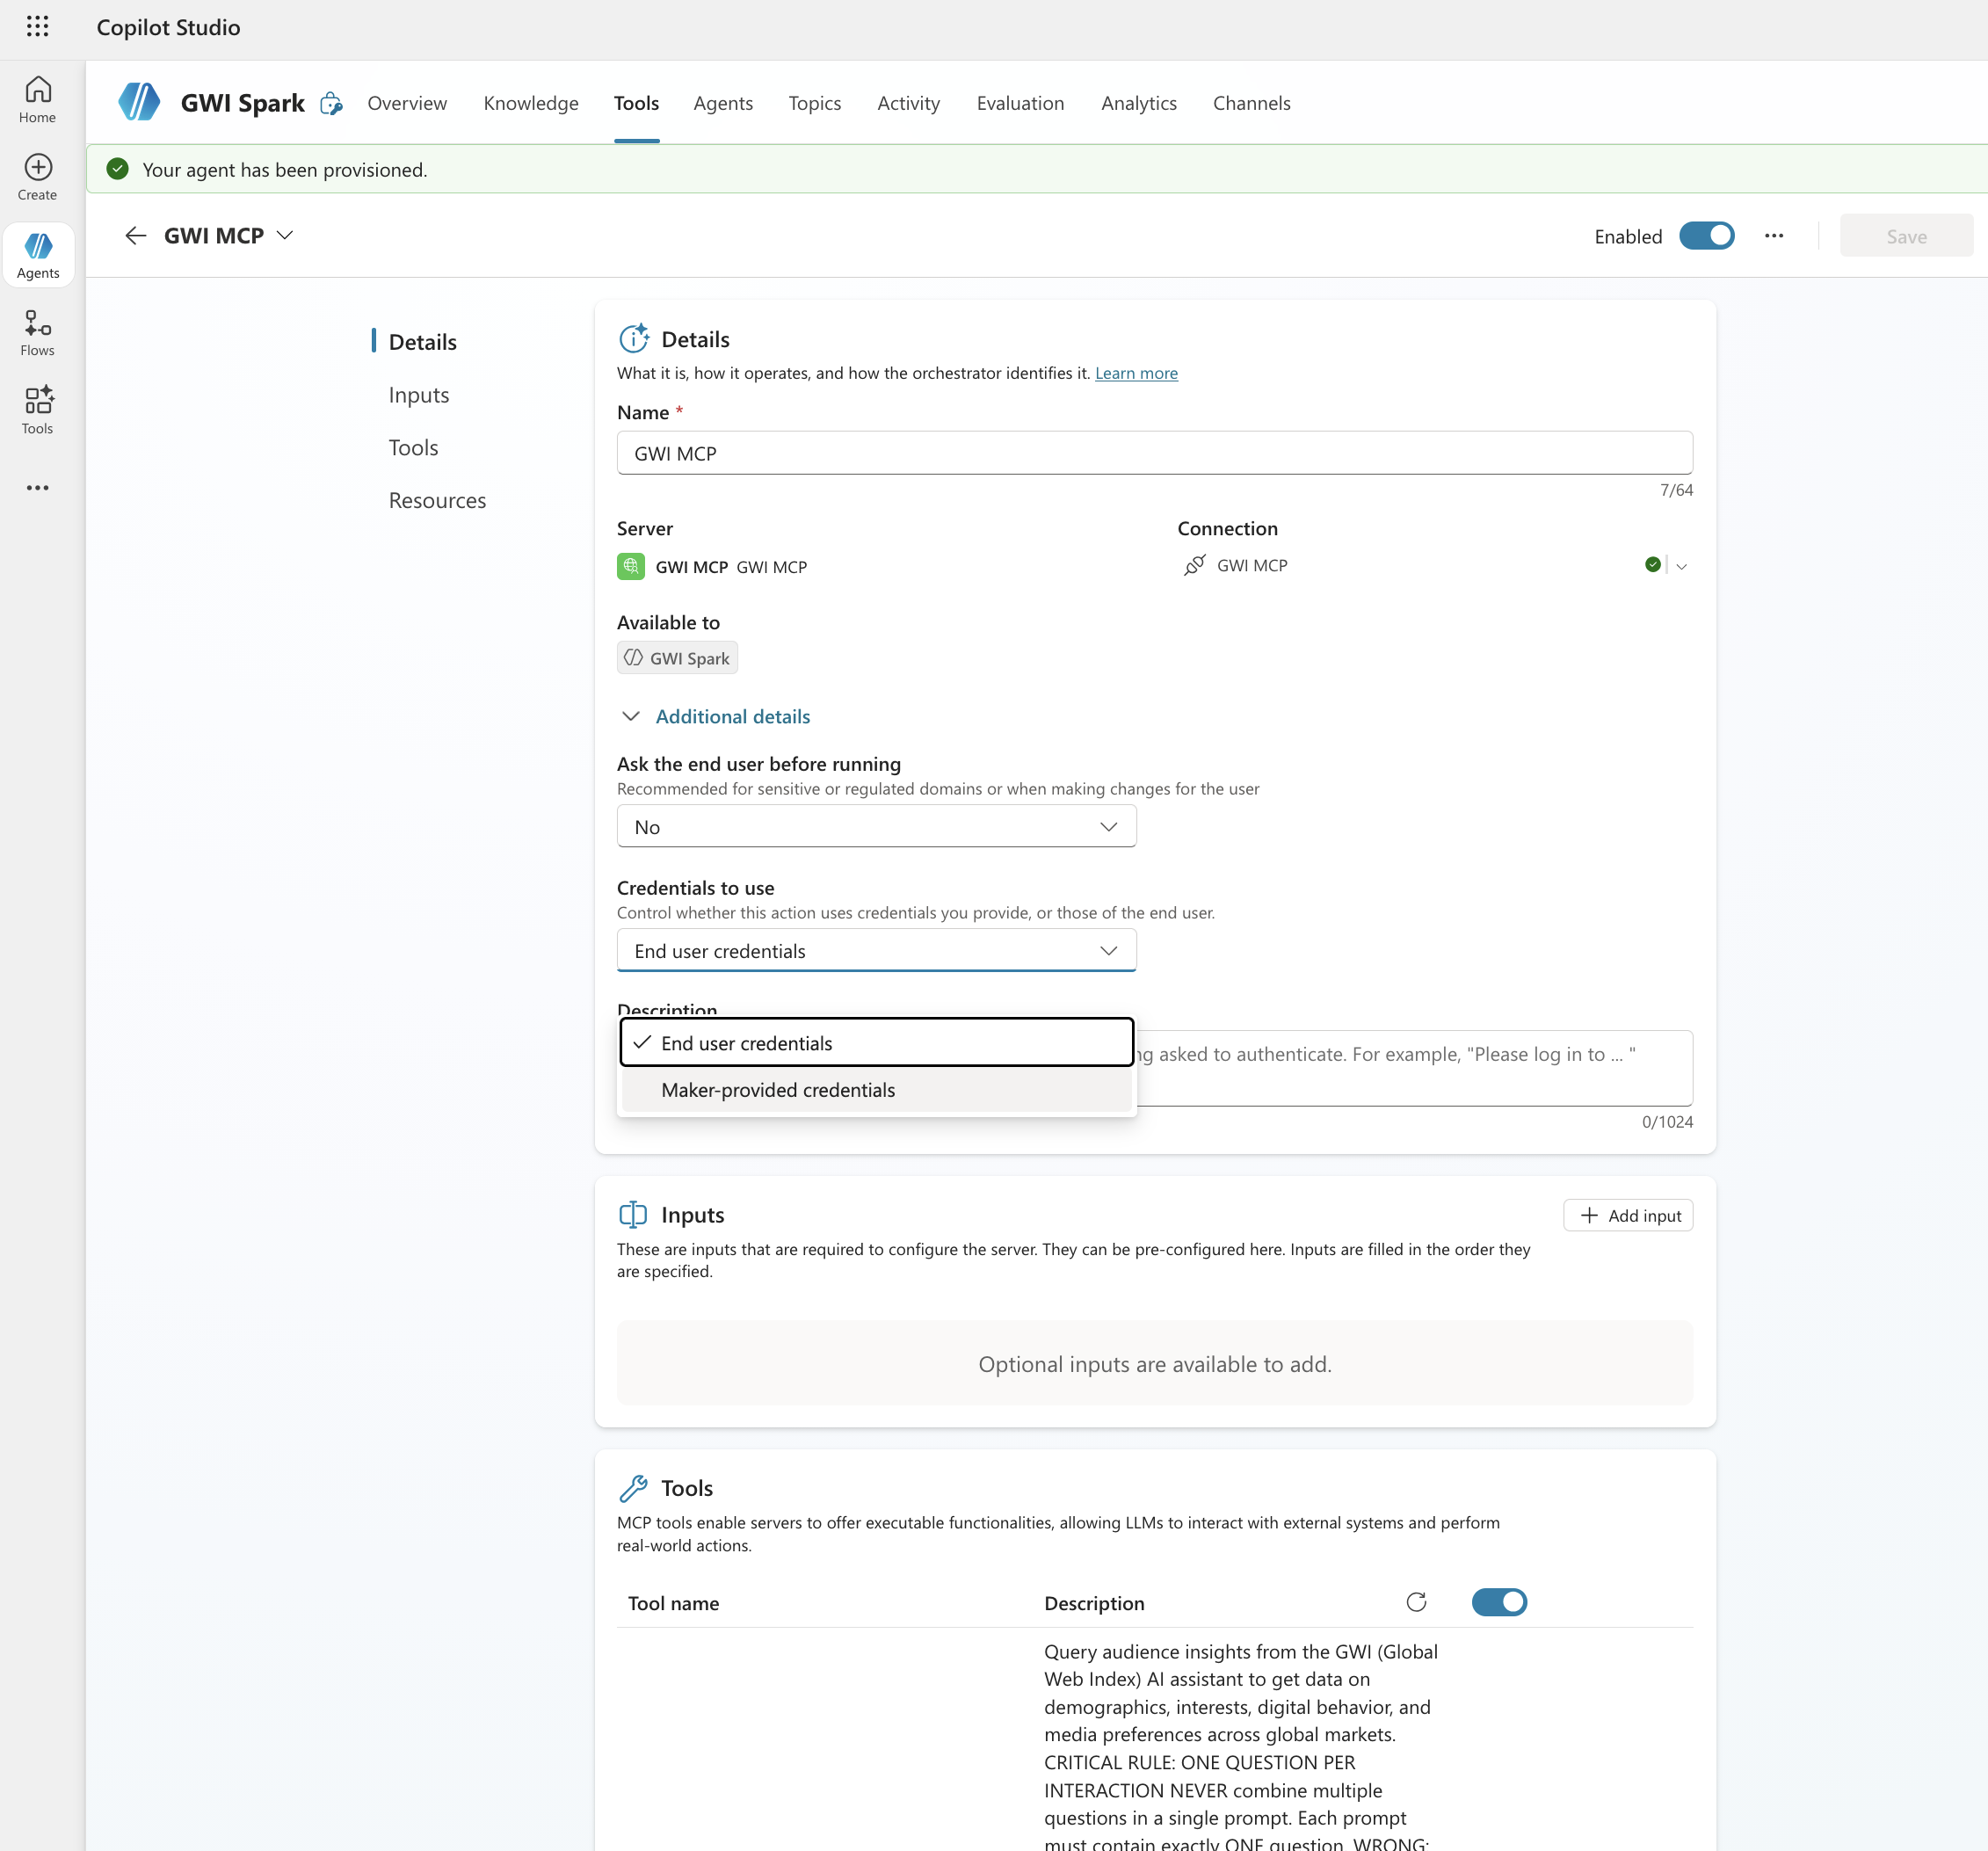
  6. You can select between two authentication modes when using MCP tools within your agent: **End user credentials** and **Maker-provided credentials**. This controls whether users should use their own GWI credentials when using the agent, or the credentials used by the tool builder.
  7. To maximise how your agent uses Spark, we recommend adding some instructions directly to the agent in Copilot. Below are some example instructions that you can add.
```markdown theme={null}
You have access to the GWI Spark MCP tools on https://api.globalwebindex.com/v2beta/spark-api/mcp.
Tools: global_filters, list_datasets, search_audiences, audience_generation, generate_insights, explore_insight.
Core rules:
- Follow this order for each new analysis: optional list_datasets → global_filters (required) → search_audiences and/or audience_generation → generate_insights → explore_insight only if the user asks for more detail on a specific insight.
- Never call audience_generation, search_audiences, or generate_insights before global_filters on a new analysis.
- One focused question per generate_insights call. Never combine multiple research questions into a single prompt.
- Break down broad user requests into 3–6 focused generate_insights calls (e.g. demographics, digital behaviour, media, interests, purchase behaviour, marketing channels).
- Pass location_codes and wave_codes from global_filters into later tools when required. Pass audience UUIDs from audience_generation or search_audiences into generate_insights.enforced_audiences.
- Call explore_insight only when the user explicitly asks for more detail on a specific insights[].id from generate_insights. Do not call it automatically after every generate_insights response.
- Prefer structuredContent from tool results for programmatic use. Aggregate findings into a clear overview for the user, with percentages and index scores where available.
Example workflow for "Help me understand PlayStation 5 owners in Japan":
1. global_filters — Japan + relevant timeframe
2. audience_generation — "PlayStation 5 owners" (or search_audiences if a saved audience title is named)
3. generate_insights — "What are the demographics of PlayStation 5 owners in Japan?"
4. generate_insights — "What social media platforms do PlayStation 5 owners in Japan use?"
5. generate_insights — "What marketing channels are most effective for reaching PlayStation 5 owners in Japan?"
6. explore_insight — only if the user picks a specific insight id and asks for more detail
Then combine results into a single detailed overview for the user.
```
8. Finally, you can test GWI Spark MCP in your agent
7. To maximise how your agent uses Spark, we recommend adding some instructions directly to the agent in Copilot. Below are some example instructions that you can add.
```markdown theme={null}
You have access to the GWI Spark MCP tools on https://api.globalwebindex.com/v2beta/spark-api/mcp.
Tools: global_filters, list_datasets, search_audiences, audience_generation, generate_insights, explore_insight.
Core rules:
- Follow this order for each new analysis: optional list_datasets → global_filters (required) → search_audiences and/or audience_generation → generate_insights → explore_insight only if the user asks for more detail on a specific insight.
- Never call audience_generation, search_audiences, or generate_insights before global_filters on a new analysis.
- One focused question per generate_insights call. Never combine multiple research questions into a single prompt.
- Break down broad user requests into 3–6 focused generate_insights calls (e.g. demographics, digital behaviour, media, interests, purchase behaviour, marketing channels).
- Pass location_codes and wave_codes from global_filters into later tools when required. Pass audience UUIDs from audience_generation or search_audiences into generate_insights.enforced_audiences.
- Call explore_insight only when the user explicitly asks for more detail on a specific insights[].id from generate_insights. Do not call it automatically after every generate_insights response.
- Prefer structuredContent from tool results for programmatic use. Aggregate findings into a clear overview for the user, with percentages and index scores where available.
Example workflow for "Help me understand PlayStation 5 owners in Japan":
1. global_filters — Japan + relevant timeframe
2. audience_generation — "PlayStation 5 owners" (or search_audiences if a saved audience title is named)
3. generate_insights — "What are the demographics of PlayStation 5 owners in Japan?"
4. generate_insights — "What social media platforms do PlayStation 5 owners in Japan use?"
5. generate_insights — "What marketing channels are most effective for reaching PlayStation 5 owners in Japan?"
6. explore_insight — only if the user picks a specific insight id and asks for more detail
Then combine results into a single detailed overview for the user.
```
8. Finally, you can test GWI Spark MCP in your agent 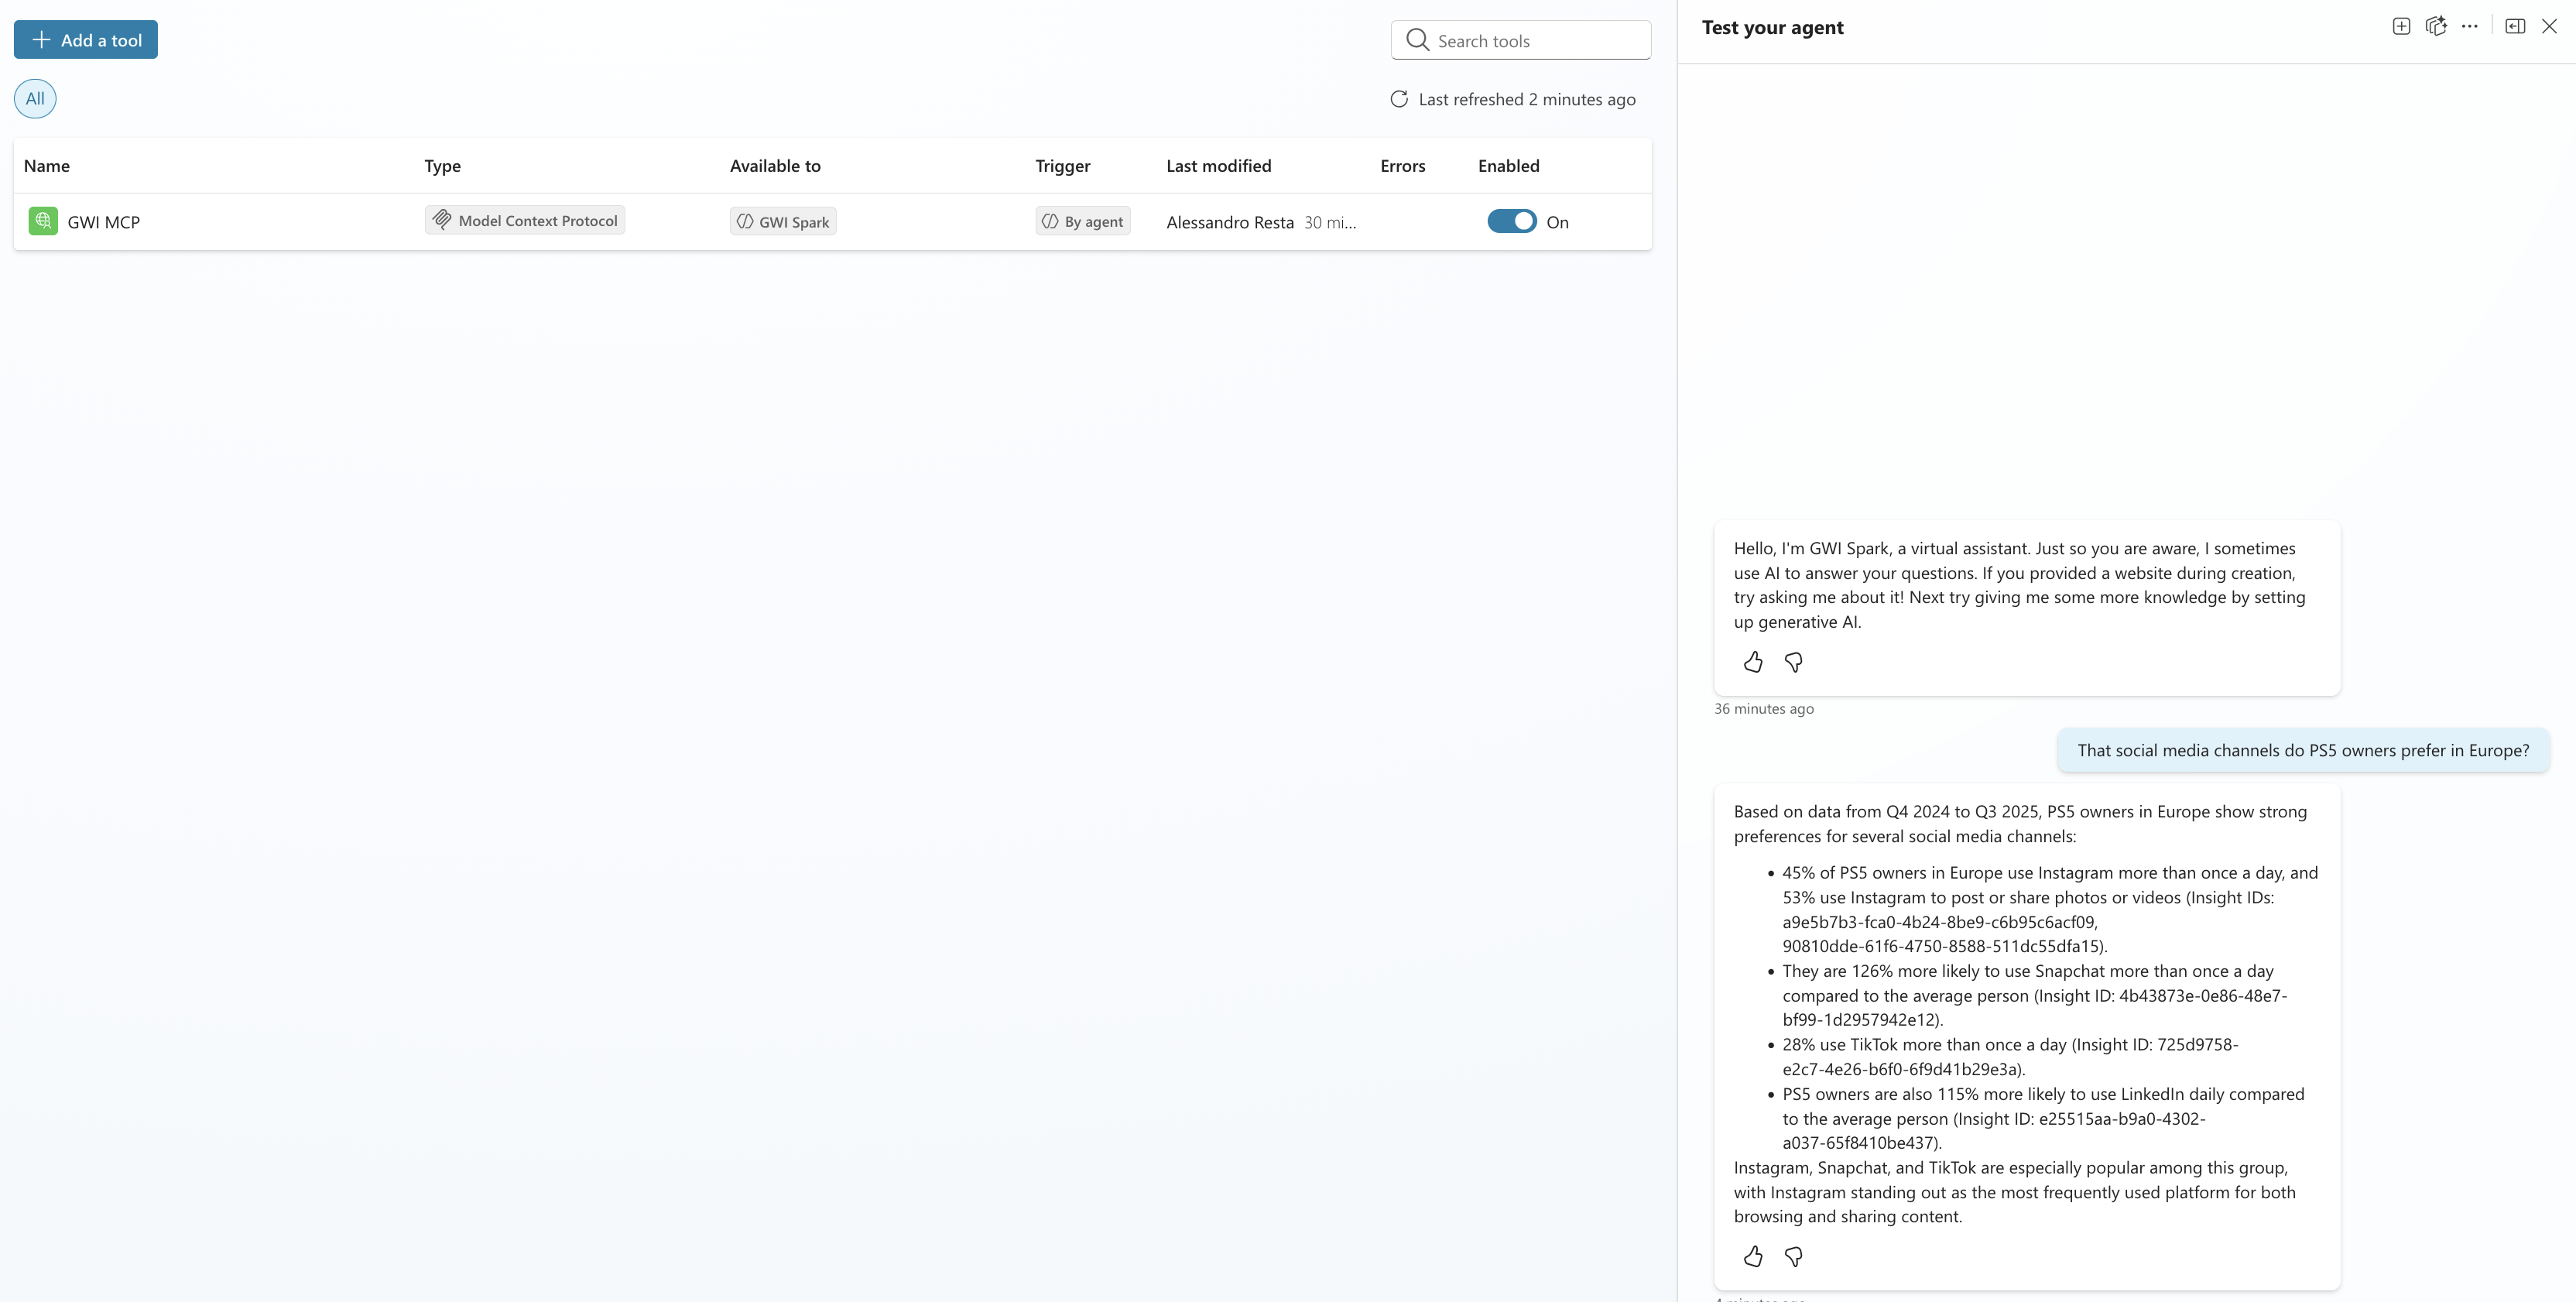 ## Publishing your agent to Microsoft Teams and Microsoft 365 Copilot
Once you've configured the GWI Spark MCP connector and tested your agent in Copilot Studio, the next step is making it available to users. Publishing to Teams or Microsoft 365 Copilot is a separate step from building; your agent won't appear anywhere until you explicitly publish and configure its availability.
### Step 1: Publish the agent
Before you can share your agent with anyone, you need to publish it at least once.
1. In Copilot Studio, open your agent.
2. In the left navigation menu, select **Publish**.
3. Review the summary and select **Publish** to confirm. After publishing, Copilot Studio packages your agent and makes it available to connect to channels. You'll need to republish any time you make significant changes to topics, actions, or the connector configuration.
## Publishing your agent to Microsoft Teams and Microsoft 365 Copilot
Once you've configured the GWI Spark MCP connector and tested your agent in Copilot Studio, the next step is making it available to users. Publishing to Teams or Microsoft 365 Copilot is a separate step from building; your agent won't appear anywhere until you explicitly publish and configure its availability.
### Step 1: Publish the agent
Before you can share your agent with anyone, you need to publish it at least once.
1. In Copilot Studio, open your agent.
2. In the left navigation menu, select **Publish**.
3. Review the summary and select **Publish** to confirm. After publishing, Copilot Studio packages your agent and makes it available to connect to channels. You'll need to republish any time you make significant changes to topics, actions, or the connector configuration. 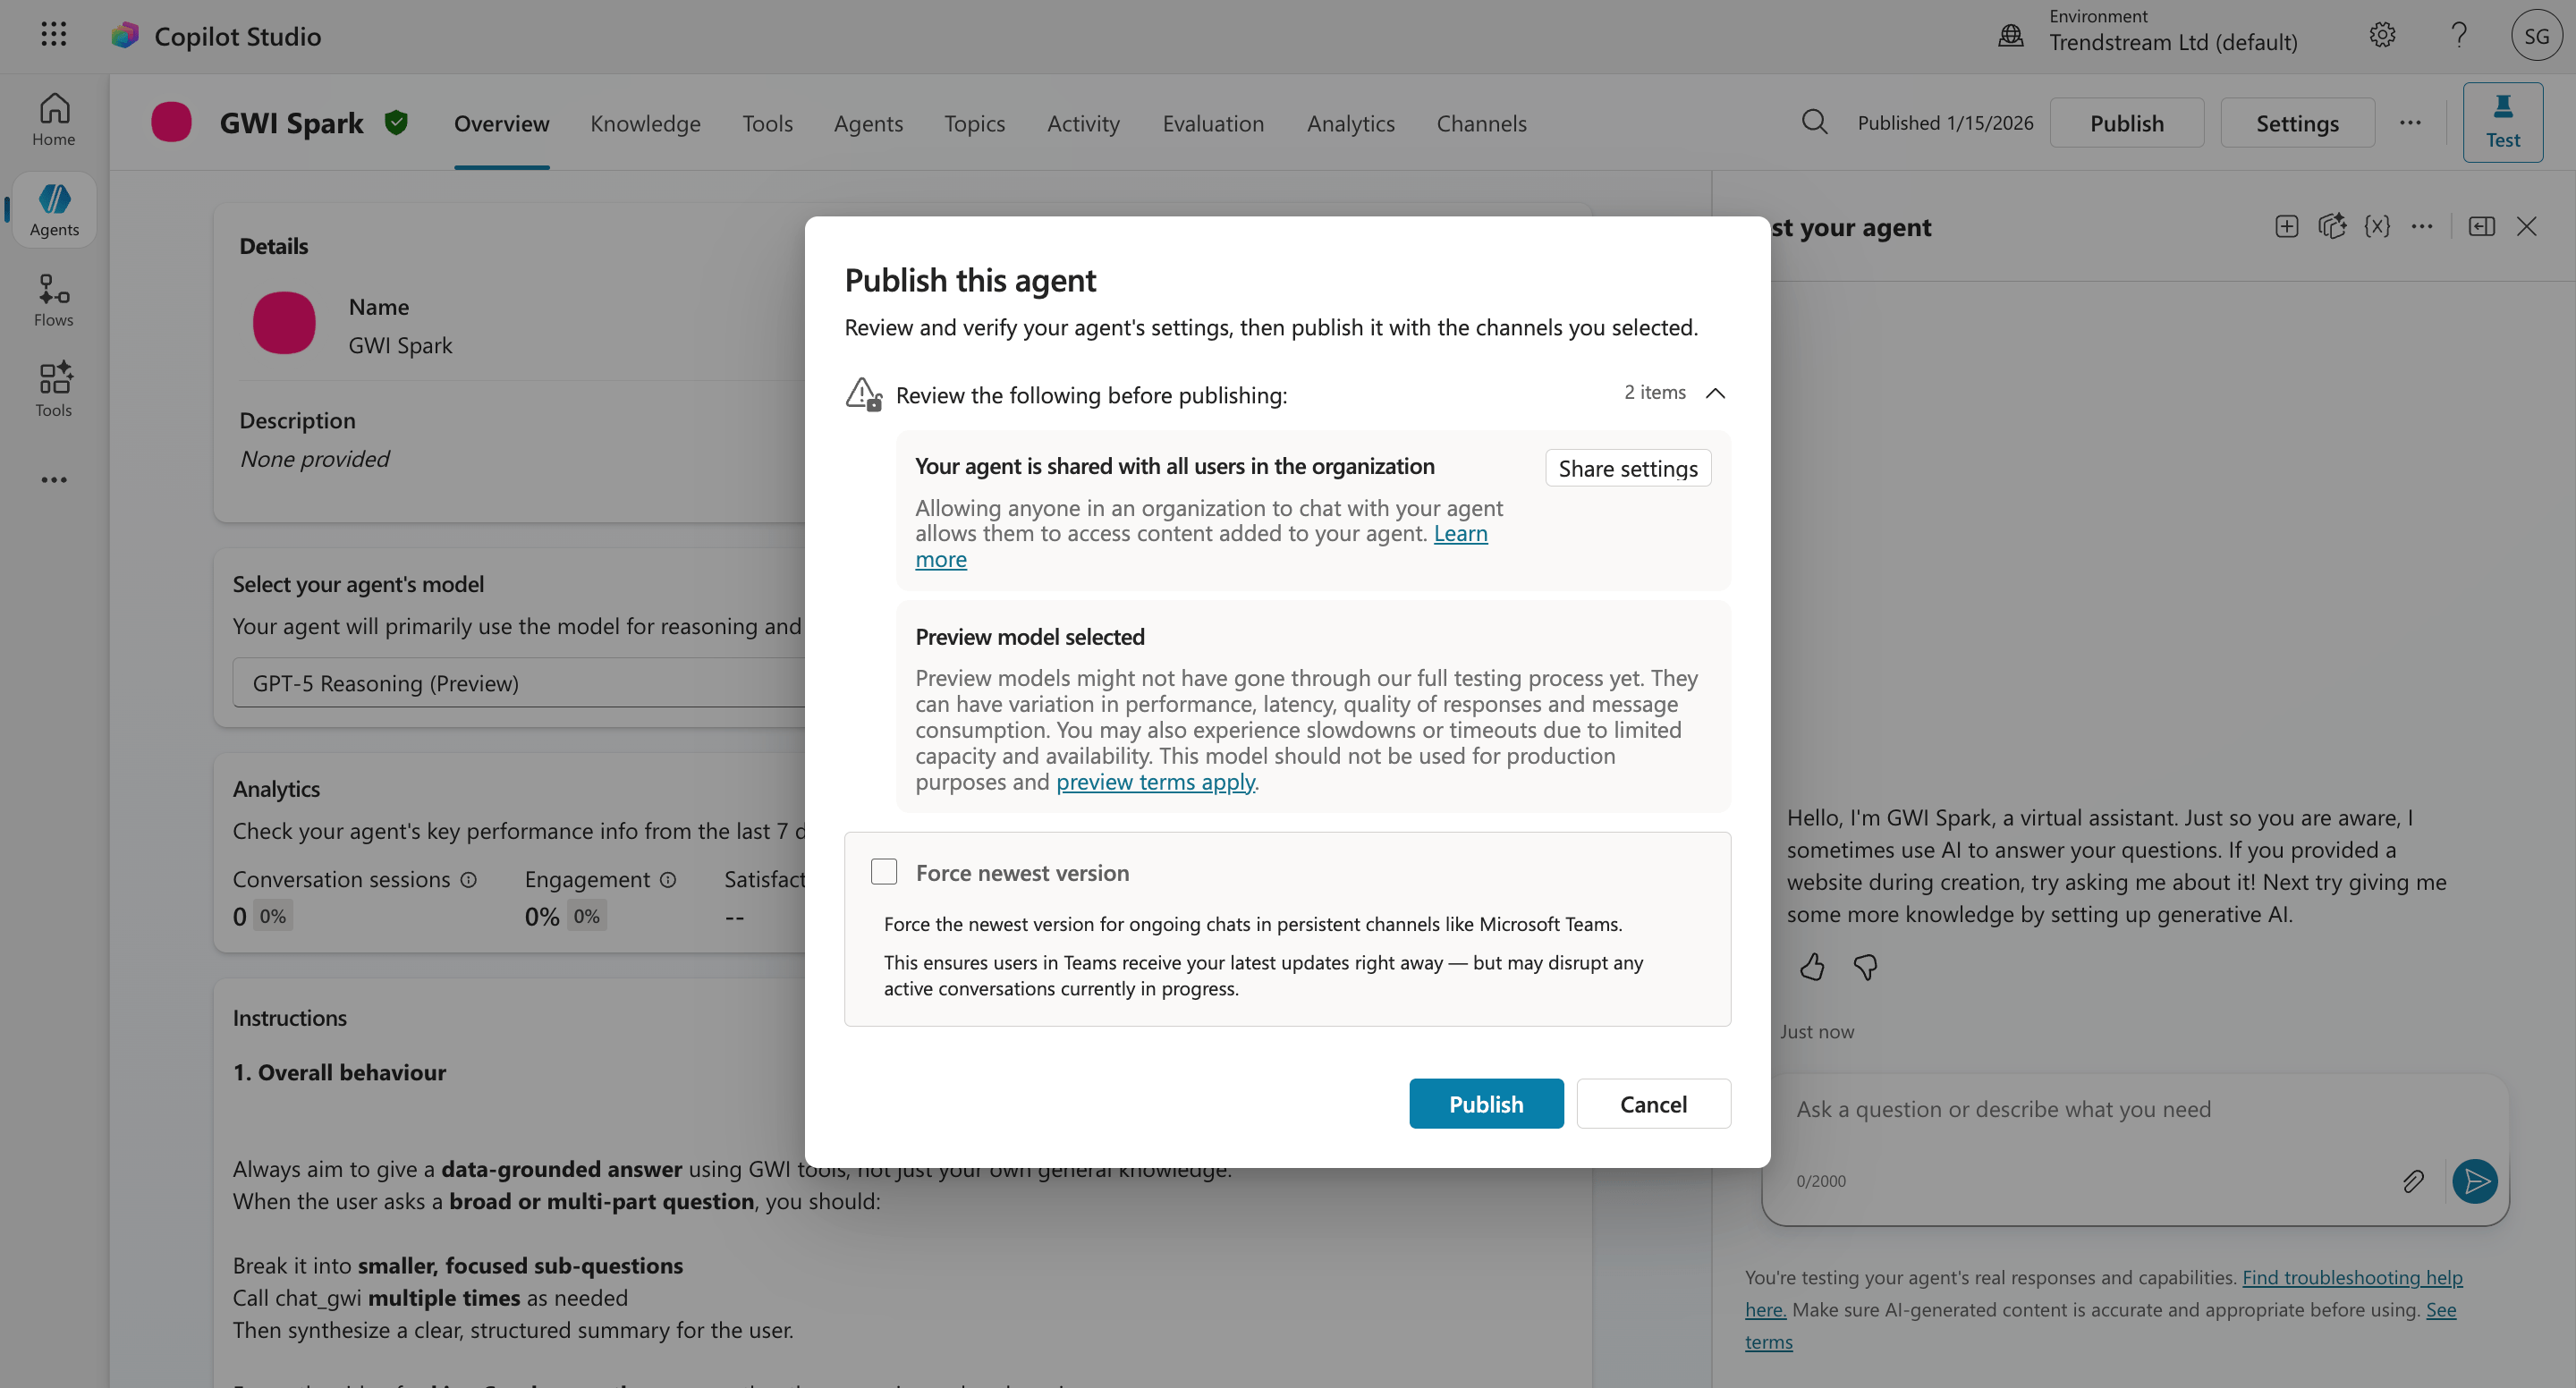 > 📖 [Key concepts: Publish and deploy your agent](https://learn.microsoft.com/en-us/microsoft-copilot-studio/publication-fundamentals-publish-channels) - Microsoft Learn
### Step 2: Connect to the Teams and Microsoft 365 Copilot channel
After publishing, you need to explicitly enable the Teams and Microsoft 365 Copilot channel:
1. In Copilot Studio, select **Channels** in the left navigation menu.
2. Select **Microsoft Teams and Microsoft 365 Copilot**.
3. Select **Turn on Teams** (if not already enabled).
4. Optionally configure the app icon, short description, and long description. These appear in the Teams app store if you distribute broadly.
5. Select **Save**.
> 📖 [Connect and configure an agent for Teams and Microsoft 365 Copilot](https://learn.microsoft.com/en-us/microsoft-copilot-studio/publication-add-bot-to-microsoft-teams) - Microsoft Learn
### Step 3: Choose your distribution method
Once the channel is enabled, select **Availability options** to decide how widely to distribute your agent. There are three main approaches depending on your rollout:
#### Option A: Share via installation link (quickest, small groups)
Best for internal pilots or sharing with a specific team.
1. In the Teams channel configuration panel, select **Availability options**.
2. Select **Copy link**.
3. Send the link to your intended users. They'll be prompted to install the agent directly in Teams.
**Note:** Installation links don't work in the Teams mobile app. If mobile users need access, use Option B or C instead.
> 📖 [Connect and configure an agent for Teams and Microsoft 365 Copilot](https://learn.microsoft.com/en-us/microsoft-copilot-studio/publication-add-bot-to-microsoft-teams) - Microsoft Learn
#### Option B: Show in "Built by your colleagues" (self-service, org-wide)
Makes your agent discoverable in the Teams app store under the **Built by your colleagues** section without requiring admin approval.
1. In **Availability options**, enable **Show in Built by Your Colleagues**.
2. Users in your organisation can search for and install the agent from the Teams app store themselves.
This is a good middle ground for broad internal rollouts where you don't need to go through an IT approval process.
#### Option C: Submit for admin approval (org-wide, managed deployment)
For wider rollouts where you want IT or a Microsoft 365 admin to control access, for example deploying the GWI agent to a whole department or the entire company.
1. In **Availability options**, select **Submit for admin approval**.
2. The agent appears in the **Requested agents** tab in the [Microsoft 365 admin center](https://admin.microsoft.com).
3. Your Microsoft 365 admin can then approve the agent, which makes it available under the **Built for your org** section of the Teams app store.
4. Admins can scope availability to specific users or groups before approving.
**Note:** If you've also enabled Microsoft 365 Copilot publishing, submitting for admin approval applies to the Microsoft 365 Agent Store as well, so one approval covers both surfaces.
> 📖 [Manage agents in the Microsoft 365 admin center](https://learn.microsoft.com/en-us/microsoft-365/admin/manage/manage-copilot-agents-integrated-apps?view=o365-worldwide) - Microsoft Learn 📖 [Publish agents for Microsoft 365 Copilot](https://learn.microsoft.com/en-us/microsoft-365/copilot/extensibility/publish) - Microsoft Learn
> 📖 [Key concepts: Publish and deploy your agent](https://learn.microsoft.com/en-us/microsoft-copilot-studio/publication-fundamentals-publish-channels) - Microsoft Learn
### Step 2: Connect to the Teams and Microsoft 365 Copilot channel
After publishing, you need to explicitly enable the Teams and Microsoft 365 Copilot channel:
1. In Copilot Studio, select **Channels** in the left navigation menu.
2. Select **Microsoft Teams and Microsoft 365 Copilot**.
3. Select **Turn on Teams** (if not already enabled).
4. Optionally configure the app icon, short description, and long description. These appear in the Teams app store if you distribute broadly.
5. Select **Save**.
> 📖 [Connect and configure an agent for Teams and Microsoft 365 Copilot](https://learn.microsoft.com/en-us/microsoft-copilot-studio/publication-add-bot-to-microsoft-teams) - Microsoft Learn
### Step 3: Choose your distribution method
Once the channel is enabled, select **Availability options** to decide how widely to distribute your agent. There are three main approaches depending on your rollout:
#### Option A: Share via installation link (quickest, small groups)
Best for internal pilots or sharing with a specific team.
1. In the Teams channel configuration panel, select **Availability options**.
2. Select **Copy link**.
3. Send the link to your intended users. They'll be prompted to install the agent directly in Teams.
**Note:** Installation links don't work in the Teams mobile app. If mobile users need access, use Option B or C instead.
> 📖 [Connect and configure an agent for Teams and Microsoft 365 Copilot](https://learn.microsoft.com/en-us/microsoft-copilot-studio/publication-add-bot-to-microsoft-teams) - Microsoft Learn
#### Option B: Show in "Built by your colleagues" (self-service, org-wide)
Makes your agent discoverable in the Teams app store under the **Built by your colleagues** section without requiring admin approval.
1. In **Availability options**, enable **Show in Built by Your Colleagues**.
2. Users in your organisation can search for and install the agent from the Teams app store themselves.
This is a good middle ground for broad internal rollouts where you don't need to go through an IT approval process.
#### Option C: Submit for admin approval (org-wide, managed deployment)
For wider rollouts where you want IT or a Microsoft 365 admin to control access, for example deploying the GWI agent to a whole department or the entire company.
1. In **Availability options**, select **Submit for admin approval**.
2. The agent appears in the **Requested agents** tab in the [Microsoft 365 admin center](https://admin.microsoft.com).
3. Your Microsoft 365 admin can then approve the agent, which makes it available under the **Built for your org** section of the Teams app store.
4. Admins can scope availability to specific users or groups before approving.
**Note:** If you've also enabled Microsoft 365 Copilot publishing, submitting for admin approval applies to the Microsoft 365 Agent Store as well, so one approval covers both surfaces.
> 📖 [Manage agents in the Microsoft 365 admin center](https://learn.microsoft.com/en-us/microsoft-365/admin/manage/manage-copilot-agents-integrated-apps?view=o365-worldwide) - Microsoft Learn 📖 [Publish agents for Microsoft 365 Copilot](https://learn.microsoft.com/en-us/microsoft-365/copilot/extensibility/publish) - Microsoft Learn 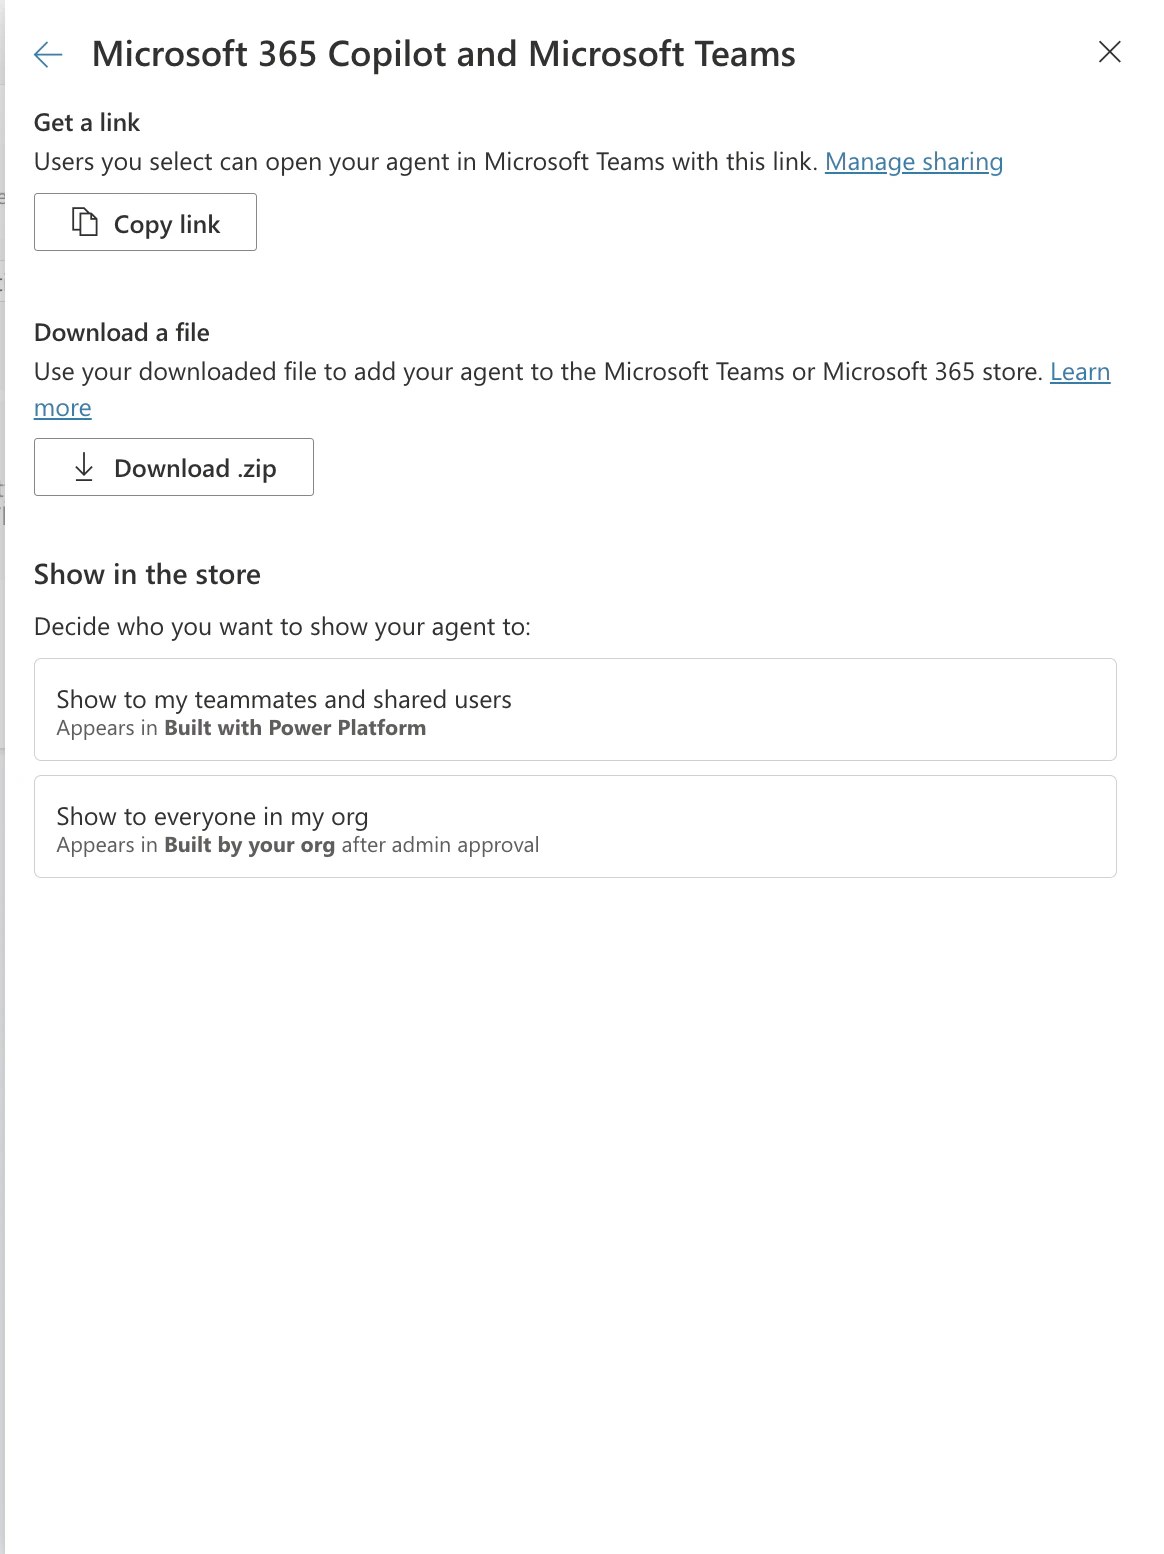 ### Where will the agent appear?
Depending on the distribution method chosen, users will find the agent in the following places:
| Surface | How users access it |
| :-------------------------------- | :------------------------------------------------------------------------ |
| **Microsoft Teams (desktop/web)** | Chat with the agent directly, or find it in the Teams app store |
| **Microsoft Teams (mobile)** | Only via app store listing; installation links don't work on mobile |
| **Microsoft 365 Copilot** | In the Copilot chat sidebar under **Agents**, once the channel is enabled |
| **Built by your colleagues** | Discoverable in Teams app store without admin action |
| **Built for your org** | Appears after admin approves via Microsoft 365 admin center |
> 📖 [Extend Microsoft 365 Copilot with agents](https://learn.microsoft.com/en-us/microsoft-copilot-studio/microsoft-copilot-extend-copilot-extensions) - Microsoft Learn
### Prerequisites and admin requirements
A few things need to be in place before users can install your agent in Teams:
* **Custom apps must be allowed** in your organisation's Teams Admin Center. If your IT team has disabled custom/sideloaded apps, the installation link and app store listing won't work. An IT admin needs to enable this under **Teams Admin Center > Teams apps > Setup policies**.
* **Microsoft 365 Copilot licence** is required for the agent to surface in Microsoft 365 Copilot chat. Teams-only access works without a Copilot licence.
* The **GWI Spark custom connector must be authenticated** in the agent before publishing. Users who install the agent will be prompted to sign in with their GWI credentials on first use.
> 📖 [Quickstart: Create and deploy an agent](https://learn.microsoft.com/en-us/microsoft-copilot-studio/fundamentals-get-started) - Microsoft Learn
***
## Troubleshooting
* **MCP server not visible** Verify the server configuration and confirm that you have proper workspace permissions.
* **Authentication failures** Confirm that your GWI account has Spark MCP access and that OAuth settings are correct.
* **Users can't find the agent in Teams** Check that custom apps are enabled in Teams Admin Center, and that the agent has been published (not just saved) in Copilot Studio.
* **The installation link isn't working on mobile** Installation links are desktop/web only. Point mobile users to the Teams app store listing instead (Options B or C above).
* **The agent asks for authentication every time** This is expected on first install. Once users authenticate with their GWI credentials, the connection is saved. If re-authentication keeps occurring, check the OAuth2 connection settings in the custom connector.
* **The agent hasn't appeared in Microsoft 365 Copilot** Confirm the Microsoft 365 Copilot channel is enabled (Step 2 above), and that the user has a Microsoft 365 Copilot licence. It can take up to 24 hours for a newly published agent to appear.
### Where will the agent appear?
Depending on the distribution method chosen, users will find the agent in the following places:
| Surface | How users access it |
| :-------------------------------- | :------------------------------------------------------------------------ |
| **Microsoft Teams (desktop/web)** | Chat with the agent directly, or find it in the Teams app store |
| **Microsoft Teams (mobile)** | Only via app store listing; installation links don't work on mobile |
| **Microsoft 365 Copilot** | In the Copilot chat sidebar under **Agents**, once the channel is enabled |
| **Built by your colleagues** | Discoverable in Teams app store without admin action |
| **Built for your org** | Appears after admin approves via Microsoft 365 admin center |
> 📖 [Extend Microsoft 365 Copilot with agents](https://learn.microsoft.com/en-us/microsoft-copilot-studio/microsoft-copilot-extend-copilot-extensions) - Microsoft Learn
### Prerequisites and admin requirements
A few things need to be in place before users can install your agent in Teams:
* **Custom apps must be allowed** in your organisation's Teams Admin Center. If your IT team has disabled custom/sideloaded apps, the installation link and app store listing won't work. An IT admin needs to enable this under **Teams Admin Center > Teams apps > Setup policies**.
* **Microsoft 365 Copilot licence** is required for the agent to surface in Microsoft 365 Copilot chat. Teams-only access works without a Copilot licence.
* The **GWI Spark custom connector must be authenticated** in the agent before publishing. Users who install the agent will be prompted to sign in with their GWI credentials on first use.
> 📖 [Quickstart: Create and deploy an agent](https://learn.microsoft.com/en-us/microsoft-copilot-studio/fundamentals-get-started) - Microsoft Learn
***
## Troubleshooting
* **MCP server not visible** Verify the server configuration and confirm that you have proper workspace permissions.
* **Authentication failures** Confirm that your GWI account has Spark MCP access and that OAuth settings are correct.
* **Users can't find the agent in Teams** Check that custom apps are enabled in Teams Admin Center, and that the agent has been published (not just saved) in Copilot Studio.
* **The installation link isn't working on mobile** Installation links are desktop/web only. Point mobile users to the Teams app store listing instead (Options B or C above).
* **The agent asks for authentication every time** This is expected on first install. Once users authenticate with their GWI credentials, the connection is saved. If re-authentication keeps occurring, check the OAuth2 connection settings in the custom connector.
* **The agent hasn't appeared in Microsoft 365 Copilot** Confirm the Microsoft 365 Copilot channel is enabled (Step 2 above), and that the user has a Microsoft 365 Copilot licence. It can take up to 24 hours for a newly published agent to appear.